Tuesday, June 26, 2012

How to Make a Haripin Lace Loom

Our meeting topic in July is Hairpin Lace and everyone needs a loom (also known as a frame or fork). I wanted to have several extra looms available in case people couldn't find one - or didn't want to buy one until they tried hairpin lace - so I discovered an easy and expensive way to make hairpin lace looms.

This idea was inspired by a resource page on the Ravelry Hairpin Lace group - this resource page contains links to Ravelry discussion threads and web pages about buying and making hairpin lace looms. The one that intrigued me the most was the link to a page that explained how to make a loom from knitting needles and a pair of flip-flops (yes, flip-flops - that's not a typo). This option seemed like a nice inexpensive idea for one loom but since I wanted to mass-produce, materials for more than one could become pricey. So I put on my thinking cap and took a tour of my husband's hobby room (he's a model railroader) and this is what I came up with.

Here is a picture of the completed loom. The loom is turned sideways - the white strips are the top and bottom spacer bars and the wooden pieces are the actual frame that you work over to make the hairpin lace.


To make the loom, I used the following materials and supplies, pictured here. The list below describes each item, working left to right:
  • Foam core - this is the white board that everything else is sitting on. Foam core can be found in most hobby stores (JoAnn's, Michaels) and also in the craft section of Walmart and similar stores. Foam core is basically two sheets of thin poster board with a thin sheet of fine-grain styrofoam glued in between.
  • Pencil - I use mechanical pencils but a regular one will work too as long as it's sharp
  • Colored marker - Any type will work
  • Ruler - If you don't have a ruler, a tape measure and any long straight-edge will work
  • Awl - An awl is a small pointed tool used for piercing holes, mostly used working with cloth or leather. I purchased mine at JoAnns several years ago so had it in my "resource center" already. A needle tool (used in paper crafting or working with clay) can also be used.  Needle tools come in various sizes, so if yours has a fine point, you'll something else, like a sharp nail, to enlarge the hole.  If you don't have an awl or a needle tool, a sharp nail alone might work. If you have an ice pick in your kitchen tools, that might also work.
  • Craft knife - These knives are also sold at the same places that sell the foam core; a common brand is XACTO. You could also substitute a razor blade if you're very brave and very careful.
  • Rubber bands - Since the loom is adjustable, several sizes are nice. The rubber bands make the loom sturdier; you may not need them.
  • Dowels - Two dowels per loom. I found a pack of dowels in the Walmart kid's craft section with dowels 3/16 inches in diameter and 12 inches long. Other sizes would work, you'll just need to make sure that the hole you make with the awl is the same size (or slightly smaller) than the diameter of your dowels.

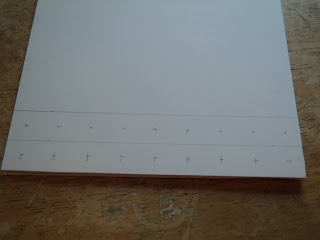
To make the loom, first I measured and marked the foam-core strips for the top and bottom spacer
bars.

For this loom, each strip is 9 inches long and 1 inch wide. I actually marked the strips on both sides of the foam core, it made cutting them apart easier.


Next I marked the location of the holes for the dowels.
  • Lengthwise, I made a mark in the center of each strip (at 4.5 inches) then made marks 1 each apart for a total of nine marks
  • Then I cross-marked each of the nine marks exactly in the center of the strip width-wise.
I made the marks for the holes on only one side of the foam-core.


Then I used the craft knife to carefully cut the strips for the top and bottom spacer bars. You can see here the importance of marking the location of dowel holes before you cut - it would have been really hard to mark the strips after they were cut apart.


Next, with the strip flat on my working surface (scrap wood, or a cutting board), I used the awl to make a starter hole for each dowel.


After I marked all the holes, I used the awl to carefully enlarge the holes for each dowel. I actually used both hands for this operation, carefully bracing the back of the foam core with one hand while I
slowly twisted and pushed the awl through the foam-core.

I lucked out - the holes my awl makes are exactly the right size for my dowels. You may have to experiment to find out how far to push in the awl.


The last step (not shown) was to mark the center hole with my colored marker and assemble the loom so that is looks like the first picture in this blog post.

I'll have eight of these looms available for the class but if you make one of your own, please bring it to show!
Thursday, June 21, 2012

Roving Crochet Reporter: Yarn Venture 2012


Those of us in the Minneapolis/St. Paul metro area are familiar with the Yarn Hop and with Shepherd’s Harvest.  The Hop is a coordinated event in which participants visit fourteen different independent yarn shops over a four-day period; Harvest is an event promoting local fiber producers (farms, that is) and local yarn shops.  But have you ever heard of YarnVenture?  YarnVenture is a combination Hop/Harvest, with participants visiting venues up and down Highway 52, from Northfield to Winona.  Instead of the free patterns and featured yarns of the Hop, YarnVenture shops hand out goodie bags (obviously, not as many do the Venture as do the Hop).  CTC members Lynn and Melanie (and friends) made the trip June 16th for the 2012 event.  This is Melanie’s report.

We met in New Market and drove to Northfield Yarns.  This store has been there for about a year.  We were the first customers of the day and were really impressed with the store.  They had a wide variety of yarns and reasonable prices.  I am basing my pricing opinion by looking at one particular yarn, the sort not found at national craft chain stores.  The price in Northfield and online from the manufacturer were the same.  We made note that Northfield will be the perfect place for a day trip in the future:  great yarn store, fun other shops, good place for lunch, close to home!  Win, win, win, win.  Northfield also had "art" along the river on Saturday.

From there we drove to Cannon Falls.  We headed to What in Yarnation and highly approved of their new location!  Nice store, good goodie bag, but my comparison yarn was much more expensive here.

Off to a sheep farm at Zumbrota.  We didn't miss the turn because of the great sign we saw along the road.  (YARN with a skein of red  hanging over it.)  We met Kevin and Marshmallow, the sheep, as well as a mean kitten, Tom the turkey and all the chickens.  The shop owner spins.  LOTS of spinning wheels.  She was so kind we were hoping our excitement of moving on to the next store didn't show too much.

From there we headed into Zumbrota to BeeLighted.  This store had the best goodie bag EVER!!!!!
 The picture shows the yarn bombed light pole out front.  (Note:  later I asked the girls if we saw any yarn in that store - which we did, but I couldn't remember because they also had so many fun gifts.)  The goodie bag included a free greeting card coupon from the store down the street, as well as a free glass of wine with a purchase coupon at the sandwich shop across the street.  We headed out to get our free greeting card.  Mine cost me $30!!  The shop owner said she was going to include a coupon for 20% off but thought a free greeting card would be better and I agreed.  We never would have gone into the store for 20% off clothing.  They had clothing, gifts, jewelry, bags, cards, etc.  Just a cute, fun store.  We headed across the street for lunch and a free glass of wine.  The sandwiches were wonderful, as was the glass of wine!  The streets of Zumbrota were lined with lawn chairs reserving spots for the 4:00 parade celebrating Covered Bridge Days.

On to Rochester.  We were ready for dessert at McDonalds after we visited Hank & Purl's.  Cute shop.  Small, reminded us of Knitter's Pallet, only smaller.  Once again we received a free goodie bag!!  WOO HOO!!!  What a way to make us feel special!!  This is the store that had the "Knit in Public" tent set up.  (We missed that by a couple of hours.)  How is it that McDonald's seems to be everywhere, but you can't get to one when you need one???  (Wrong lane to exit; mixed up directions, etc.)

We were on our way down Hwy. 52 and on to I90 without a McDonald's stop.  Winona, here we come!!  We passed a McDonald's on the way to Yarnology.  Yes, we drove right past.  If there was any chance we would be eligible for a goodie bag, McDonalds could wait!!  Winona was in the middle of celebrating Steamboat Days.  Main Street was blocked off for tractors, food vendors, classic cars, etc. We made it into the beautiful new Yarnology store and were warmly greeted by the owner, but too late for a goodie bag.  This store was beautiful and spacious.  The price of my comparison yarn was just a little higher than the online price  We also saw some uncommon yarn brands, which was a plus.  They had a nice knitting/crocheting area in the center of the store and a huge table in back for classes.  It was a nice store, worthy of the YarnVenture but too far from home (Winona is a drive!).

FINALLY we got to McDonalds!!  What a relief.  Restroom and McFlurry!  Whew!  Does life get any better??

On the road again, with ears popping as we climbed up from the river valley; the route was very scenic and beautiful.  We stopped in Rochester at Hobby Lobby for a little while and then off to Zumbrota for gas.  It was after 6:00 and the 4:00 parade was still going on!  Perhaps taking in Zumbrota for Covered Wagon Days should be on the calendar in the future!

We were back in New Market twelve hours after we left, still as giddy and happy as when we started out that day!  Go figure!!!  We were relieved that the weather cooperated - yes we drove through rain a couple of times, but it never got stinkin' hot like we expected it would.  It was a perfect day.  I'm definitely putting this on my calendar for next year!  It was well worth it!!!

Thanks, Melanie!  And let the rest of us know the dates next year so we can put it on our calendars as well.

Midtown Global Market: June 30 5th Saturday Outing

Do you crochat?

That's what we do at our informal Fifth Saturday get-togethers--crochet and chat.

We'll meet from noon to 2PMSaturday, June 30th at Midtown Global Market.  We'll gather on the south side of the building, facing Lake Street.  There is a seating area near the windows overlooking the street.  (Just hunt for it, it isn't hard to find.). There's no planned class, just a chance to gather informally over food and crochet.

The Market is a collection of ethnic restaurants and shops with something for everyone. It's located in Minneapolis near Chicago and Lake Street in the old Sears Building, just two blocks away from Abbott-Northwestern Hospital. There is a parking ramp to the east of the building on 10th Ave East and Lake; if you purchase anything in the Market (no minimum purchase), they will validate your parking stub for up to 3 free hours of parking. Click here for a map and parking details.

Hope to see you there!

Friday, June 15, 2012

Meeting Hightlights: Filet Crochet

Isn't this heart design cute? That's what we made in Julie's filet class.

Actually, that's what I made. Other people's filet samples look different because they didn't make the same mistake I made in repeating a row.  Although the pattern utilized only chains and double crochet, we all made our share of errors.  Common mistakes were filing in blocks with three stitches instead of two and making the foundation chain the wrong length.  Filet crochet seems simple, but it is harder than it looks because you must pay careful attention to what you are doing.

Julie says if you want to try filet,  pick a pattern that is symmetrical.  Pattern charts are read from the bottom up, from right to left to right to left.  But you are always actually crocheting from right to left (if right-handed).  While progressing through the chart, you suddenly realize your are on a left-to-right row but crocheting from right to left--it can be very disconcerting.

Julie's second hint is to count your stitches regularly and count your rows.  It also helps to mark your chart so you know what row you are on.  Filet crochet depends upon regularity--stitches the same height, chains the same length, and the proper spaces filled in.  Your mistakes will show if you are not careful; you want to catch your mistakes early because you will have to frog.

We are officially taking reservations for the September 2012 retreat to be held September 28th through the 30th at Memories at the Depot in Woodville WI.  Think of it as an entire weekend to crochet with your friends.  More specifics regarding the retreat can be obtained by sending a request to ctclist@gmail.com.  There's only room for seventeen participants.  Reservations must be received by June 30th, so send in your application soon.

June has five Saturdays.  We will meet at noon, June 30th, at Midtown Global Market for a Fifth Saturday informal get-together.  If you want to take your chances with your retreat reservation, reservation forms will be available at the meeting; just be sure to bring your $25.00 deposit with you.

Our next meeting will be July 14th, 2012.  The meeting will focus on hairpin lace.  Maxine will teach us the basic stitch and several ways of joining strips.

Thursday, June 14, 2012

Project Gallery June 2012

Aren't these colors lovely? Click on the picture to enlarge it so you can see that this yarn includes seed beads, which give the yarn a subtle sheen. Gail made this triangular shawl to wear at her daughter's wedding. The stitch pattern allows for a flattering drape. Gail's husband made a shawl pin from lilac wood specially for this shawl.


Jodi finished her summer top, made of Lion Brand Cotton-Ease. All the fancy details are found on the back of the garment. The straps and bodice closure are highlighted with white buttons. Jodi was afraid that the crocheted fabric would be too open, requiring some sort of undergarment, but that is not the case. The open stitch pattern below the bodice allows the breeze to pass through, making the garment cool to wear.

Jodi had one more item to share. She made an eyeglass case to match the phone holder she had made previously. She embroidered the case using a ribbon yarn.