 Here is a picture of the completed loom. The loom is turned sideways - the white strips are the top and bottom spacer bars and the wooden pieces are the actual frame that you work over to make the hairpin lace.
 To make the loom, I used the following materials and supplies, pictured here. The list below describes each item, working left to right:
 - Foam core - this is the white board that everything else is sitting on. Foam core can be found in most hobby stores (JoAnn's, Michaels) and also in the craft section of Walmart and similar stores. Foam core is basically two sheets of thin poster board with a thin sheet of fine-grain styrofoam glued in between.
- Pencil - I use mechanical pencils but a regular one will work too as long as it's sharp
- Colored marker - Any type will work
- Ruler - If you don't have a ruler, a tape measure and any long straight-edge will work
- Awl - An awl is a small pointed tool used for piercing holes, mostly used working with cloth or leather. I purchased mine at JoAnns several years ago so had it in my "resource center" already. A needle tool (used in paper crafting or working with clay) can also be used. Needle tools come in various sizes, so if yours has a fine point, you'll something else, like a sharp nail, to enlarge the hole. If you don't have an awl or a needle tool, a sharp nail alone might work. If you have an ice pick in your kitchen tools, that might also work.
- Craft knife - These knives are also sold at the same places that sell the foam core; a common brand is XACTO. You could also substitute a razor blade if you're very brave and very careful.
- Rubber bands - Since the loom is adjustable, several sizes are nice. The rubber bands make the loom sturdier; you may not need them.
- Dowels - Two dowels per loom. I found a pack of dowels in the Walmart kid's craft section with dowels 3/16 inches in diameter and 12 inches long. Other sizes would work, you'll just need to make sure that the hole you make with the awl is the same size (or slightly smaller) than the diameter of your dowels.
 To make the loom, first I measured and marked the foam-core strips for the top and bottom spacer
 bars.
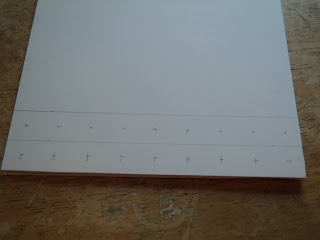
For this loom, each strip is 9 inches long and 1 inch wide. I actually marked the strips on both sides of the foam core, it made cutting them apart easier.
Next I marked the location of the holes for the dowels.
- Lengthwise, I made a mark in the center of each strip (at 4.5 inches) then made marks 1 each apart for a total of nine marks
- Then I cross-marked each of the nine marks exactly in the center of the strip width-wise.
 Then I used the craft knife to carefully cut the strips for the top and bottom spacer bars. You can see here the importance of marking the location of dowel holes before you cut - it would have been really hard to mark the strips after they were cut apart.
 After I marked all the holes, I used the awl to carefully enlarge the holes for each dowel. I actually used both hands for this operation, carefully bracing the back of the foam core with one hand while I
 slowly twisted and pushed the awl through the foam-core.
I lucked out - the holes my awl makes are exactly the right size for my dowels. You may have to experiment to find out how far to push in the awl.
The last step (not shown) was to mark the center hole with my colored marker and assemble the loom so that is looks like the first picture in this blog post.
I'll have eight of these looms available for the class but if you make one of your own, please bring it to show!


